Set Network Transit
设置网络中转
一. 背景需求
日常回家或出差办公,需要随时访问公司服务设备。为了方便且安全,最佳方案就是部署一个 VPN 服务,下述就是通过 WireGuard 打通办公内网。
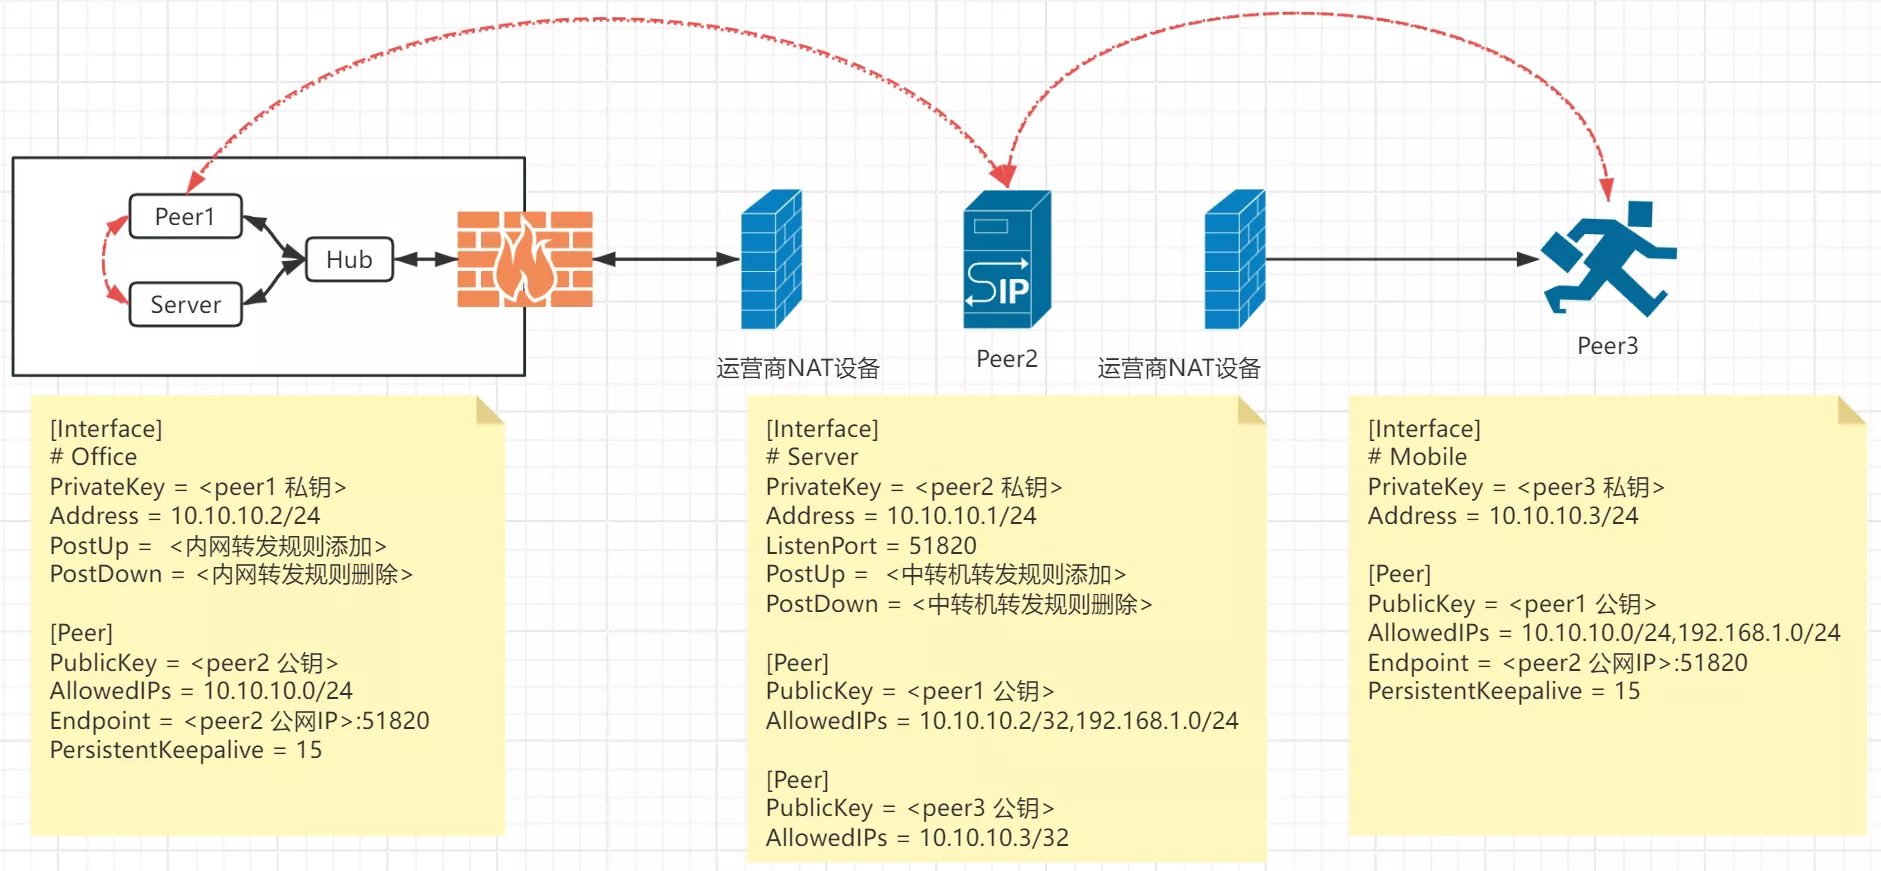
示例图如下图所示,Peer1(Office) 部署了 WireGuard 作为内网中转主机(Rocky9),其内网使用 VRRP 组网,且 FW 设备作为网关连接运营商 NAT 设备,Peer2 是处于公网中的 RPI-4B 中转服务器(Ubuntu24),Peer3 则是需要访问 Peer1 中内网服务的设备(Win11);

二. 服务部署
2.1 Peer2
首先部署 Peer2 中转服务器,使用 Raspberry Pi-4B_Ubuntu24,配置 iptables 转发规则,将 Peer3 的流量转发给 Peer1
| # 配置镜像源
$ cat /etc/apt/sources.list.d/ubuntu.sources
Types: deb
URIs: https://mirrors.tuna.tsinghua.edu.cn/ubuntu
Suites: noble noble-updates noble-backports
Components: main restricted universe multiverse
Signed-By: /usr/share/keyrings/ubuntu-archive-keyring.gpg
# 默认注释了源码镜像以提高 apt update 速度,如有需要可自行取消注释
# Types: deb-src
# URIs: https://mirrors.tuna.tsinghua.edu.cn/ubuntu
# Suites: noble noble-updates noble-backports
# Components: main restricted universe multiverse
# Signed-By: /usr/share/keyrings/ubuntu-archive-keyring.gpg
# 以下安全更新软件源包含了官方源与镜像站配置,如有需要可自行修改注释切换
Types: deb
URIs: http://security.ubuntu.com/ubuntu/
Suites: noble-security
Components: main restricted universe multiverse
Signed-By: /usr/share/keyrings/ubuntu-archive-keyring.gpg
# Types: deb-src
# URIs: http://security.ubuntu.com/ubuntu/
# Suites: noble-security
# Components: main restricted universe multiverse
# Signed-By: /usr/share/keyrings/ubuntu-archive-keyring.gpg
# 预发布软件源,不建议启用
# Types: deb
# URIs: https://mirrors.tuna.tsinghua.edu.cn/ubuntu
# Suites: noble-proposed
# Components: main restricted universe multiverse
# Signed-By: /usr/share/keyrings/ubuntu-archive-keyring.gpg
# # Types: deb-src
# # URIs: https://mirrors.tuna.tsinghua.edu.cn/ubuntu
# # Suites: noble-proposed
# # Components: main restricted universe multiverse
# # Signed-By: /usr/share/keyrings/ubuntu-archive-keyring.gpg
|
更新系统,安装程序,开启流量转发
| $ sudo apt-get update
$ apt install wireguard resolvconf qrencode -y
$ smodprobe wireguard && lsmod | grep wireguard
$ cat /etc/sysctl.conf
net.ipv4.ip_forward=1
|
创建密钥和 wg 配置文件
| $ mkdir -p /etc/wireguard/certs
$ cd !$
$ wg genkey | tee privatekey-server | wg pubkey > publickey-server
$ wg genkey | tee privatekey-office | wg pubkey > publickey-office
$ wg genkey | tee privatekey-mobile | wg pubkey > publickey-mobile
|
| $ cd /etc/wireguard;touch wg0.conf
[Interface]
Address = 10.10.10.1/24
# 因直接通过公网IP+Port方式,故无需DNS
# DNS = 223.5.5.5
ListenPort = 51820
PrivateKey = <Peer2-Server 私钥>
PostUp = iptables -A FORWARD -i %i -j ACCEPT; iptables -A FORWARD -o %i -j ACCEPT; iptables -t nat -A POSTROUTING -o eth0 -j MASQUERADE
PostDown = iptables -D FORWARD -i %i -j ACCEPT; iptables -D FORWARD -o %i -j ACCEPT; iptables -t nat -D POSTROUTING -o eth0 -j MASQUERADE
[peer]
PublicKey = <Peer1-Office 公钥>
# 此需配置具体IP,非IP段,而1.0/24网段是想将该网段的流量都流向peer1
AllowedIPs = 10.10.10.2/32,192.168.1.0/24
[Peer]
PublicKey = <Peer3-Mobile 公钥>
# 此需配置具体IP,非IP段
AllowedIPs = 10.10.10.3/32
|
PS:如果配置之后连不上,可能是防火墙的问题,自行放行 UDP 端口
2.2 Peer1
这里的 Peer1 也是中转服务,不过此通过 iptables 进行内网转发,指定 Peer 为公网的中转服务器 Peer2,并配置 Peer2 的 endpoint
| # 修改镜像源,更新程序
$ sed -e 's|^mirrorlist=|#mirrorlist=|g' \
-e 's|^#baseurl=http://dl.rockylinux.org/$contentdir|baseurl=https://mirrors.aliyun.com/rockylinux|g' \
-i.bak \
/etc/yum.repos.d/[Rr]ocky*.repo
$ dnf config-manager --set-enabled crb
$ dnf install epel-release
$ sed -e 's|^metalink=|#metalink=|g' \
-e 's|^#baseurl=https://download.example/pub|baseurl=https://mirrors.aliyun.com|g' \
-i.bak \
/etc/yum.repos.d/epel{,-testing}.repo
$ dnf clean all; dnf makecache
$ dnf update -y; dnf upgrade -y
|
为了确保后续所有的流量正常转发,此处作关闭防火墙及安全设置
| $ systemctl disable --now firewalld
$ sed -i 's/SELINUX=.*/SELINUX=disabled/' /etc/selinux/config
|
开启流量转发功能
| $ cat > /etc/modules-load.d/br_netfilter.conf << EOF
br_netfilter
EOF
$ chmod 755 /etc/modules-load.d/br_netfilter.conf
$ lsmod | grep br_netfilter
$ cat /etc/sysctl.conf
net.ipv4.ip_forward=1
|
安装程序并创建配置文件
| $ dnf install wireguard-tools
$ touch /etc/wireguard/wg0.conf
[Interface]
PrivateKey = <Peer1-Office 私钥>
Address = 10.10.10.2/24
# 因直接通过公网IP+Port方式,故无需DNS
# DNS = 223.5.5.5
# 注意Eth0应改为自身的实际网卡名字
PostUp = iptables -A FORWARD -i %i -j ACCEPT; iptables -A FORWARD -o %i -j ACCEPT; iptables -t nat -A POSTROUTING -o eth0 -j MASQUERADE
PostDown = iptables -D FORWARD -i %i -j ACCEPT; iptables -D FORWARD -o %i -j ACCEPT; iptables -t nat -D POSTROUTING -o eth0 -j MASQUERADE
[Peer]
PublicKey = <Peer2-Server 公钥>
# 此需配置成IP段,非具体IP-10.1/32,如单独直连则改为10.1/32
AllowedIPs = 10.10.10.0/24
Endpoint = <Peer2 公网IP>:51820
PersistentKeepalive = 15
|
概要说明
Peer1 通过内网转发规则,将数据包做 MASQUERADE 源地址转换,并通过 ETH0 转发出去;【简单概要就是将 wg 网卡收到的数据转发给主机网卡发送出去,并且配置 MASQUERADE,源地址将修改成 Eth0 的地址,从而实现该数据包是 Peer1 产生并发送到内网其他主机一样(而其实该数据包来源于位于公网的 Peer2)】
另外 PersistentKeepalive 参数用于保持链接的存活,默认情况下 WG 在不使用的时候,尽量少发送数据包,但对于位于 NAT 后的 Peer1 或 Peer3 来讲,其公网地址随时都在变化,因此可通过定时发送存活包让 Peer2 知晓 Peer1 & Peer3 的公网地址与对应的端口,保持链接的存活性,类似 IP 漫游;
2.3 Peer3
此处 Peer3 配置最为简单,只作为流量接收,不做转发,仅需要配置 Peer2 的 endpoint
| [Interface]
PrivateKey = <Peer3-Mobile 私钥>
Address = 10.10.10.3/24
[Peer]
PublicKey = <Peer2-Server 公钥>
# 就peer3而言,整个1.0/24网段都应发给中转机处理
AllowedIPs = 10.10.10.0/24, 192.168.1.0/24
Endpoint = <Peer2 公网IP>:51820
PersistentKeepalive = 15
|
