Nexus3 Repo Type
Nexus3 仓库目录说明,主要讲解 Repo 类型及基本使用
不管搭建的方式,Nexus3 文件目录及 Repo 类型都是一样的
目录说明
启动后的 Nexus3 工作目录分为安装目录 nexus 和数据目录 sonatype-work
| $ docker exec -it nexus3 ls -l /opt/sonatype
total 4
drwxr-xr-x 1 root root 17 Mar 27 14:20 nexus
drwxr-xr-x 2 nexus nexus 20 Mar 27 14:20 sonatype-work
-rwxr-xr-x 1 root root 56 Mar 27 14:20 start-nexus-repository-manager.sh
|
| $ docker exec -it nexus3 ls -l /opt/sonatype/nexus
total 80
-rw-r--r-- 1 root root 651 Mar 23 19:21 NOTICE.txt
-rw-r--r-- 1 root root 17321 Mar 23 19:21 OSS-LICENSE.txt
-rw-r--r-- 1 root root 41955 Mar 23 19:21 PRO-LICENSE.txt
drwxr-xr-x 1 root root 29 Mar 27 14:20 bin # 启动脚本和相关配置
drwxr-xr-x 2 root root 26 Mar 27 14:20 deploy
drwxr-xr-x 1 root root 38 Mar 27 14:20 etc # jetty、karaf等配置文件
drwxr-xr-x 5 root root 4096 Mar 27 14:20 lib # java包库/环境
drwxr-xr-x 2 root root 4096 Mar 27 14:20 public # 应用在本地起来所需要的资源
drwxr-xr-x 3 root root 59 Mar 27 14:20 replicator
drwxr-xr-x 23 root root 4096 Mar 27 14:20 system # 应用所有的插件和组件
|
| # 启动脚本对应bin目录下的nexus
bash-4.4$ cat start-nexus-repository-manager.sh
#!/bin/bash
cd /opt/sonatype/nexus
exec ./bin/nexus run
|
| $ docker exec -it nexus3 ls -l /opt/sonatype/sonatype-work
total 0
lrwxrwxrwx 1 root root 11 Mar 27 14:20 nexus3 -> /nexus-data
$ docker exec -it nexus3 ls -l /nexus-data
total 28
drwxr-xr-x 3 nexus nexus 21 Apr 3 04:05 blobs # 创建blob的默认路径
drwxr-xr-x 324 nexus nexus 8192 Apr 3 06:15 cache # 当前缓存的karaf包的信息
drwxr-xr-x 6 nexus nexus 113 Apr 3 04:05 db # OrientDB数据库的数据,用于存储nexus的元数据的数据库
drwxr-xr-x 3 nexus nexus 36 Apr 3 06:14 elasticsearch # 当前配置的Elasticsearch状态
drwxr-xr-x 3 nexus nexus 45 Apr 3 04:05 etc # 运行时配置状态和关于资源库的自定义的相关的东西
drwxr-xr-x 2 nexus nexus 6 Apr 3 04:05 generated-bundles
drwxr-xr-x 2 nexus nexus 33 Apr 3 04:05 instances
-rw-r--r-- 1 nexus nexus 1 Apr 3 06:15 karaf.pid
drwxr-xr-x 3 nexus nexus 18 Apr 3 04:05 keystores # 自动生成的关于资源库的ID主键
-rw-r--r-- 1 nexus nexus 14 Apr 3 06:15 lock
drwxr-xr-x 3 nexus nexus 112 Apr 3 04:05 log # 运行实例生成的日志文件,也有日志文件的压缩包
drwxr-xr-x 2 nexus nexus 6 Apr 3 04:05 orient
-rw-r--r-- 1 nexus nexus 5 Apr 3 06:15 port
drwxr-xr-x 2 nexus nexus 6 Apr 3 04:05 restore-from-backup
drwxr-xr-x 7 nexus nexus 4096 Apr 3 07:36 tmp # 用于存储临时文件的目录
|
具体的配置文件作用,可参考 官方文档

- 【代理资源库】配置了外网的 maven 远程仓库地址的资源库,本地找不到,就会通过代理资源库中的地址,找到远程仓库,从远程仓库中下载所需要的 jar
- 【托管资源库】本地的资源库,从远程仓库中下不到,需要自行网上查找,下载放至托管资源库中,交由 nexus 统一管理
- 【组资源库】此资源库中并没有 jar 包,而是把代理资源库和托管资源库统一配置到组资源库中,然后组资源库作为一个唯一的 public 提供给所有人使用
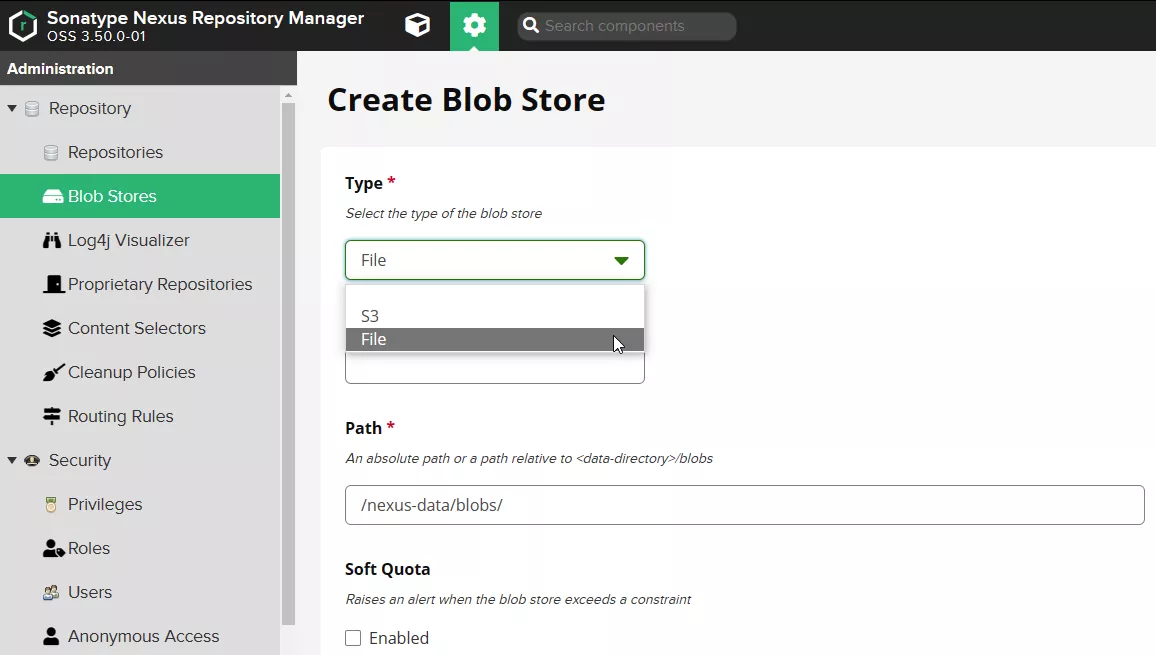
存储目录
文件存储目录,默认在 sonatype-work/blobs 中,可自定义目录

另外文件为 File 本地目录,也可使用 S3 后端存储

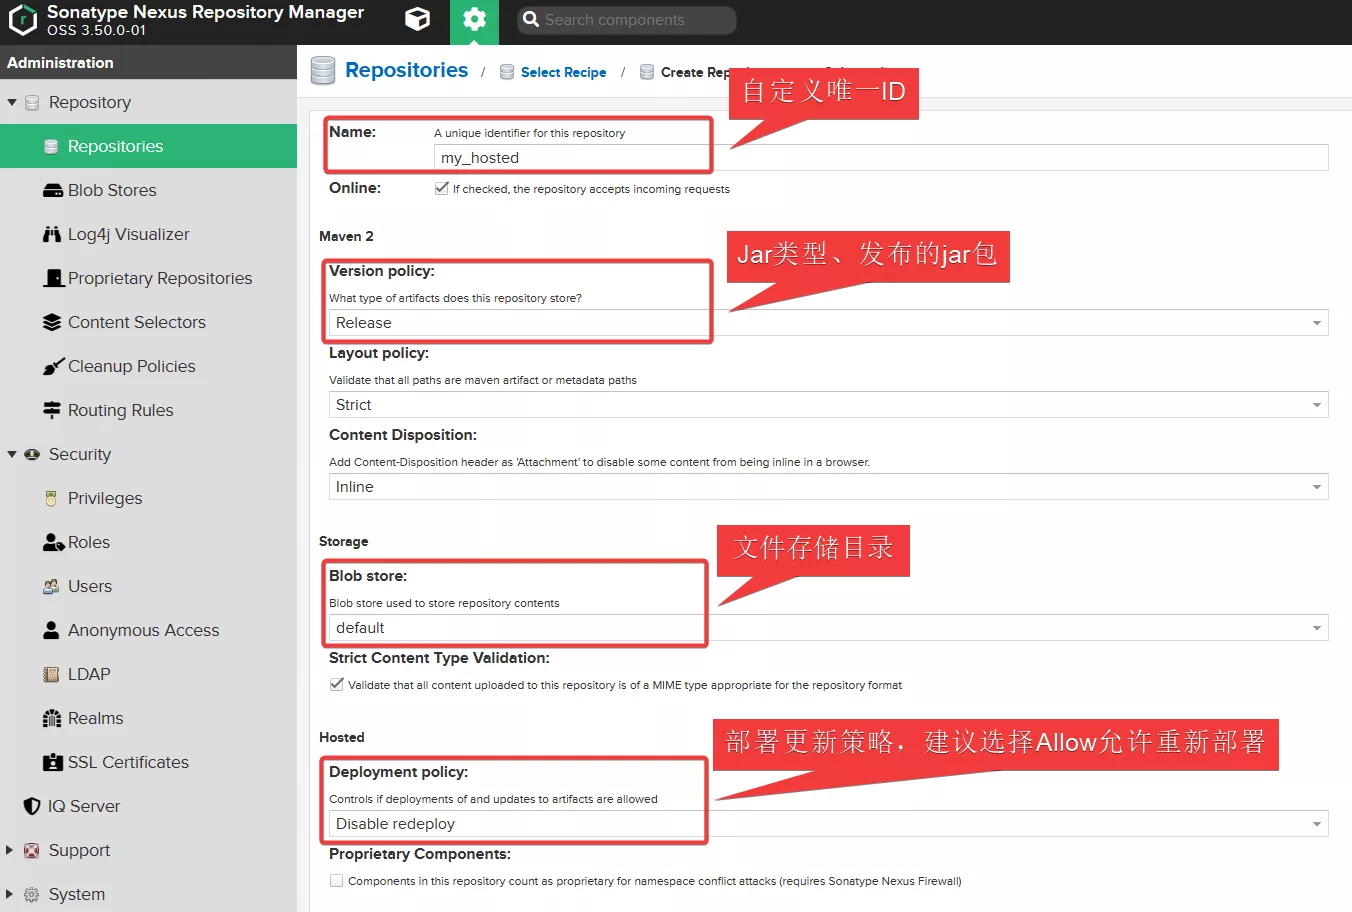
创建 Proxy Repository 代理资源库
主要定义以下三处,其它不用更改,默认即可;

【注意】如需添加更多的远程 maven 仓库的话,建议按如下顺序加入 group 资源库:
hosted 资源库 > 国内 proxy 资源库 > 国外 proxy 资源库,另常用的 maven 远程仓库如下地址:
- jboss maven 中央仓库地址:http://repository.jboss.com/maven2/
- aliyun maven 中央仓库地址:http://maven.aliyun.com/nexus/content/groups/public/
- apache maven 中央仓库地址:http://repo.maven.apache.org/maven2/
创建 hosted repository 托管资源库
Hosted 有三种方式,Releases、SNAPSHOT、Mixed
- Releases:已经发布的 Jar 包
- Snapshot:未发布的版本
- Mixed:混合的

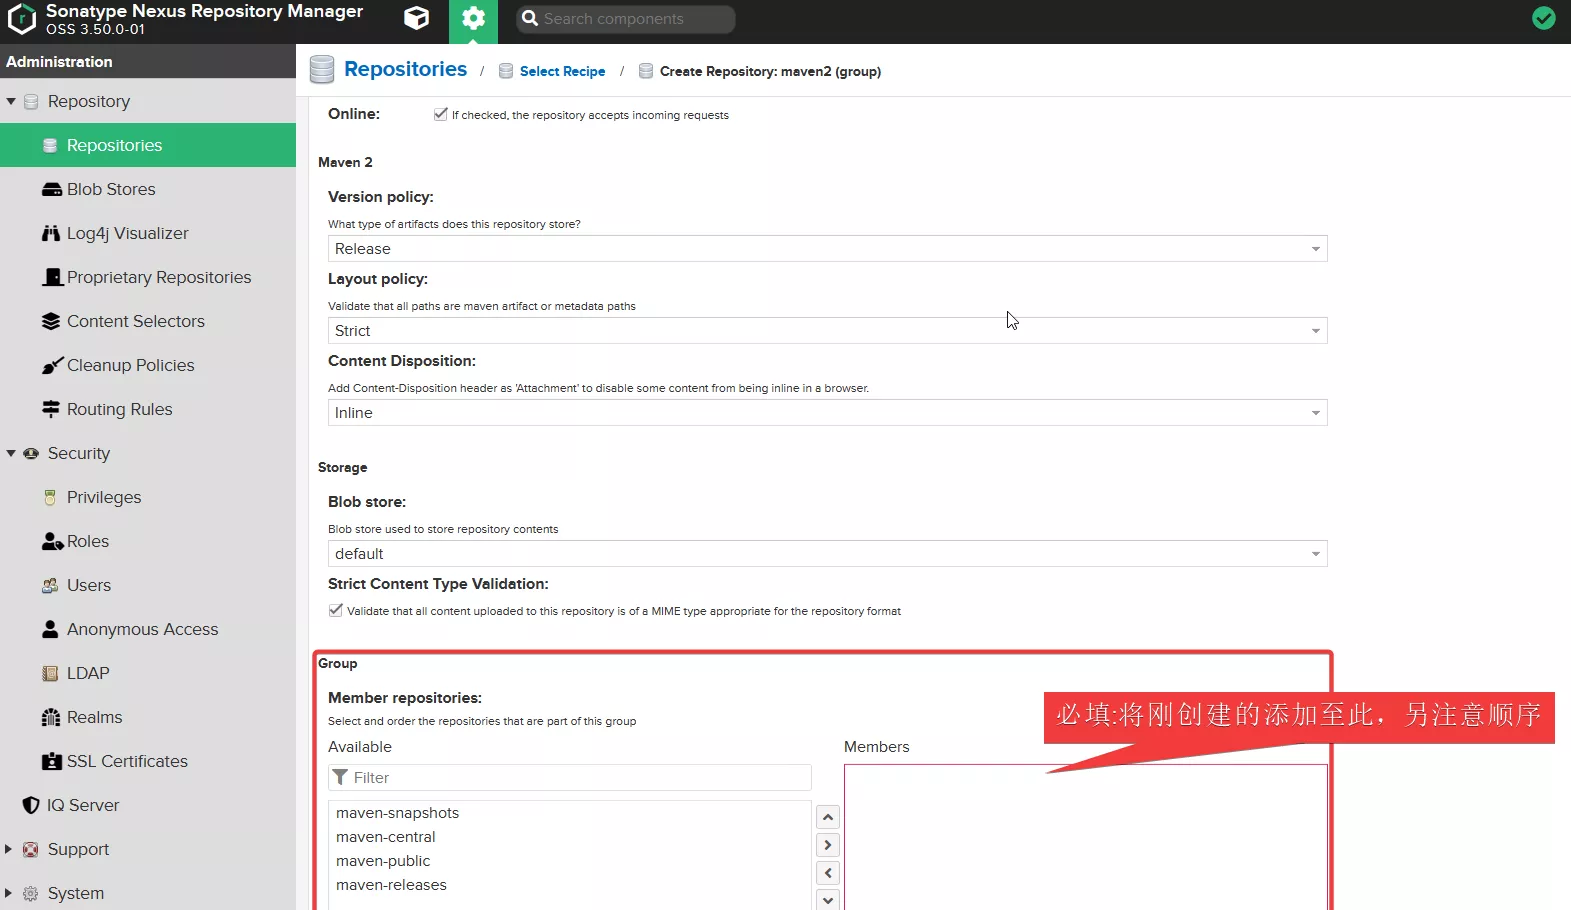
创建 group repository 组资源库
It is recommended practice to place hosted repositories higher in the list than proxy repositories. For proxy repositories, the repository manager needs to check the remote repository which will incur more overhead than a hosted repository lookup.
上述为官方说明:建议将 hosted 托管库放在 proxy 代理库之前(列表中最高位),便于资源快速查找

项目配置 maven 私服关联
maven 下的 setting.xml 文件和项目中的 pom.xml 文件关系:
setting.xml 文件就是本地,电脑上的全局变量,而 pom.xml 文件就是局部变量- 创建的
pom.xml 文件对于项目来说,则优先使用,而 pom.xml 文件中如未指定 jar 则按全局变量中定义的地址上查找
- maven 编译打包时,如不修改则一切按照默认值执行,例如本地仓库默认存储目录
用户/.m2/文件目录
| <!--就是配置maven本地仓库的地址为自定义的地址-->
<localRepository>D:\apps\repository</localRepository>
<!--nexus服务器-->
<servers>
<server>
<id>nexus</id>
<username>admin</username>
<password>admin123</password>
</server>
</servers>
<!--组资源库的url地址 id和name自定义,mirrorOf的值设置为central,写死的-->
<mirrors>
<mirror>
<id>nexus</id>
<name>nexus repository</name>
<url>http://localhost:8081/repository/myself_group/</url>
<mirrorOf>central</mirrorOf>
</mirror>
</mirrors>
|
上传第三方 jar 至 nexus,除 Web-UI 上传外,也可以使用命令方式上传
1)把 hosted 资源库配置至 maven 的 setting.xml 文件中
| <!--id自定义,但是在使用命令上传的时候会用到-->
<server>
<id>myself_hosted</id>
<username>admin</username>
<password>admin123</password>
</server>
|
2)执行命令上传指定文件至指定的资源库
| $ mvn deploy:deploy-file -DgroupId=sxd.jar -DartifactId=jacob -Dversion=1.18 -Dpackaging=jar -Dfile=G:\jar\jacob-1.18.jar -Durl=http://localhost:8081/repository/myself_hosted/ -DrepositoryId=myself_hosted
|
命令解释:
- -DgroupId=sxd.jar:自定义
- -DartifactId=jacob:自定义
- -Dversion=1.18:自定义,构建
pom.xml 文件中的坐标
- -Dpackaging=jar:上传的类型
- -Dfile=G:\jar\jacob-1.18.jar:jar 包的所在路径
- -Durl=http://localhost:8081/repository/myself_hosted/:hosted 资源库地址
- -DrepositoryId=myself_hosted:setting.xml 文件中配置的 ID
3)在项目的 pom.xml 文件中引入一下 jar 包
| <dependency>
<groupId>sxd.jar</groupId>
<artifactId>jacob</artifactId>
<version>1.18</version>
<scope>provided</scope>
</dependency>
|


